Warning - as of version v1.7.1, help is integrated into the application itself.
Therefore this standalone manual is now deprecated but is left as a reference for users using older versions.
This document is the user manual for Datafeed Studio.
Thanks for purchasing Datafeed Studio - the ideal solution for creating affiliate based web sites.
Prior to installing the Datafeed Studio software, you will need to create a MySQL database, assigning a user to it. Make a note of the connection details as you will need them for a later step in the install process.
Extract the dfstudio.zip into the public folder of your web server, e.g.
/home/username/yourdomain.com
Copy your license.txt file to the same folder, i.e. it should be in the same folder as the file install.php. If you are using the trial version, you can skip this step.
Browse to http://yourdomain.com/install.php
If all is well you should see the following screen. If not note that parts of the Datafeed Studio installation are protected by the Ioncube Encoder Software and you may need to install the correct Ioncube Loaders which are a free download from here (loaders for Linux X86 are included in the Datafeed Studio distribution and should work automatically on these systems without extra configuration.)
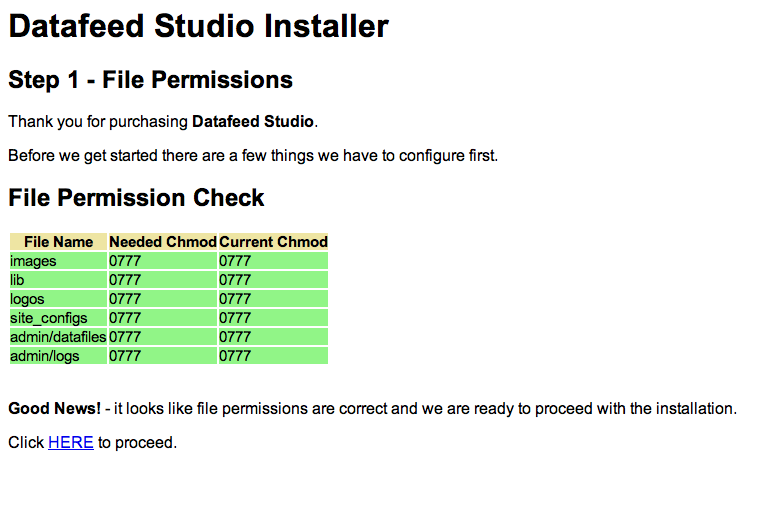
The first thing the install process does it sanity check the file permissions of the files and folders it needs write access to.
If any of the files or folders are shown in red then you need to change the permissions of the items, either by doing a “chmod 0777
When the permissions are correct, a link to the second part of the installation process will appear. Click this for Step 2 - Database settings.
You are now prompted for the connection details for the MySQL database you have created for Datafeed Studio’s use.
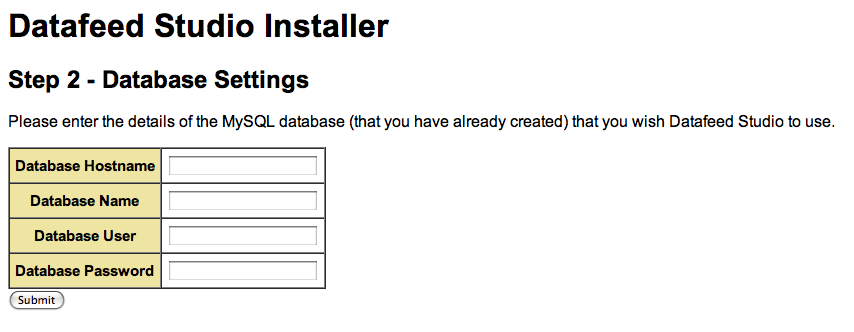
Press Submit to continue.
If the database tables were created correctly, you will be taken to the final Step, Site Settings. Otherwise you will be returned to Step 2 and asked for your database connection details again.
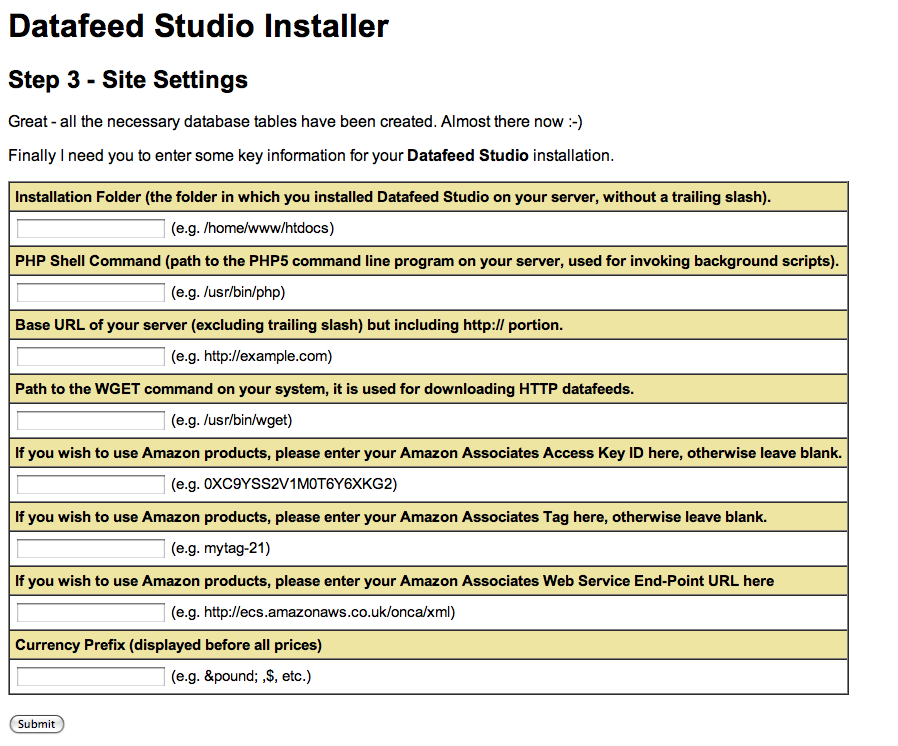
You are now prompted for other misc. settings for your Datafeed Studio intallation. Please take time and care to ensure what you enter is accurate as a mistake here could result in a misconfigured installation.
Once you are happy with the settings press Submit. If all is well then you should see the following screen, otherwise any errors with the settings you entered will be displayed and you will be asked to correct them.
Note : if your web server has mod_security enabled then you may not be able to submit this final part of the form depending on the settings of your hosting provider. If this happens to you (typical symptoms are 503 Apache Errors being displayed) then hit Back in your browser and remove one field at a time and submit again until successful. In this situation you will need to edit the file admin/includes/config.inc manually to complete the installation.
The administration site features a tabbed interface giving quick access to common functions.
This is the first tab you will see after installation.
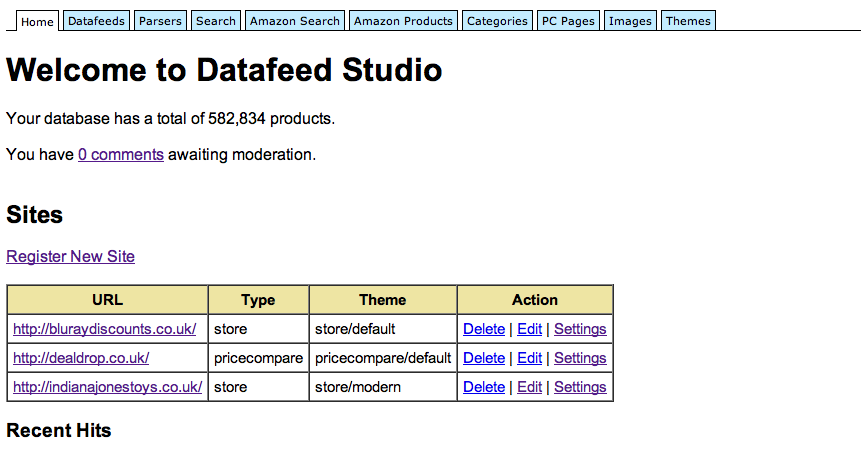
It provides a summary of your sites and any recent activity on them, including if you have any reviews of your affiliate products that need moderation. If you have, click on the comments link to approve / delete the submitted user content.
The first action you should take is to register your site by choosing the Register New Site option.
For each registered site, the Home Tab displays a summary in a table that allows you to Delete, Edit or change the Settings / Style (note that the style setting is only active for some site types) of each site.
The Home Tab also lists the most recent clickthroughs to a merchant site that your registered sites have made, together with the URL that the user made the click from.
You must register your site with Datafeed Studio. Registration involves providing the URL of the site, the type of site you want and the theme to use.
Note that Datafeed Studio strictly binds to the URL you provide, so if you input "example.com" as your URL, this will NOT match users browsing to "www.example.com". To fix this, you may want to add the following lines to the .htaccess file present in the root folder of the application.
	# redirect if www.example.com (case-insensitive) to example.com
	RewriteCond %{HTTP_HOST} ^www\.example\.com [NC]
	RewriteRule (.*) http://example.com/$1 [R=301,L]
Also be aware that if you install Datafeed Studio in a sub-folder, .e.g. http://example.com/mystore then you will need to update the RewriteBase rule in the .htaccess file, changing the target from "/" to "/mystore".

The following sites are supported by Datafeed Studio, each supported by different customisable themes.
Single Price Compare Page - this is typically a single-page with a strong focus towards selling a single product, backed up with price compare results for the product. For an example see the site Wii Bundles.
Price Compare Engine - allows users to enter a product name that is checked against your database for price comparison matches. For an example see the site Deal Drop.
Store Site - displays your database of products in the style of an online store. Categories of products can be defined by you (manual or dynamic) or you can just accept what category the merchant has entered in the datafeed. For an example see the site Indiana Jones Toys
Note : see ‘Registering Multiple Sites’ in the Appendix for information on how to operate multiple affiliate sites.
Clicking on the Settings link next to a site allows you to customise the site to suit your needs, inlcluding things such as the site title, description, keywords for search engines, categories to use, etc.
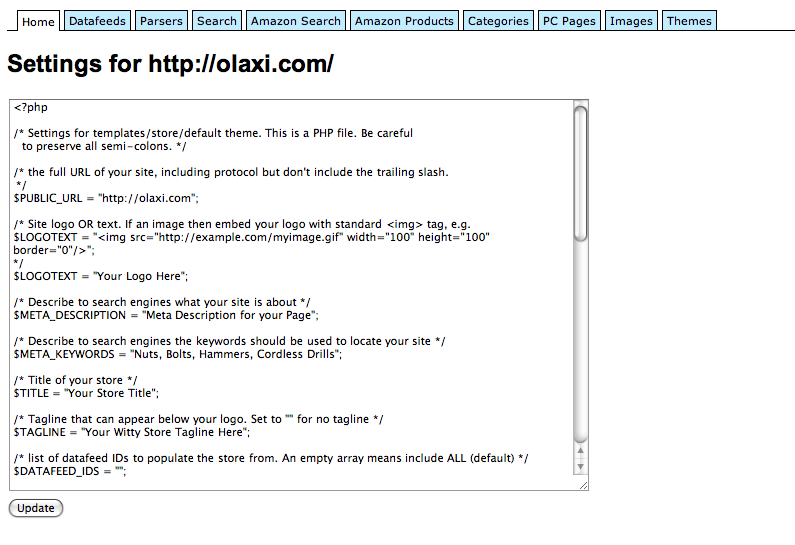
Each option is fully documented and comes with example settings for you to override.
Once happy with your changes click on the Submit link to save your changes.
In order for your site to do anything useful - it needs data.
The Datafeed Tab is where you manage your datafeeds. See the screenshot below for an example of a Datafeed Studio installation with several registered datafeeds.

For each registered datafeed this screen shows the following information :
ID - unique ID of this datafeed (you may need this when customising your site)
Logo - identifying logo for the merchant used in this datafeed
Merchant Name - name of the merchant that is referenced in this datafeed (one merchant per datafeed)
Type - manual or automatic. Manual feeds operate off data you have uploaded into the admin/datafiles folder of the application, automatic ones download the data from the URL you provide.
Status - informs you of what state the datafeed is in, may be one of New, Downloading, Importing or Imported.
Total Products - the number of products that this datafeed has imported in your database.
Actions - provides you with a set of actions against the datafeed. These are Delete, Edit or Import if you manually want to import just this datafeed into your database straight away.
To register a new datafeed, click on the New Datafeed link.
To force a refresh (download and import into your database) of each datafeed click on the Import ALL Datafeeds link.
The New Datafeed screen allows you to register a new datafeed within the Datafeed Studio application.
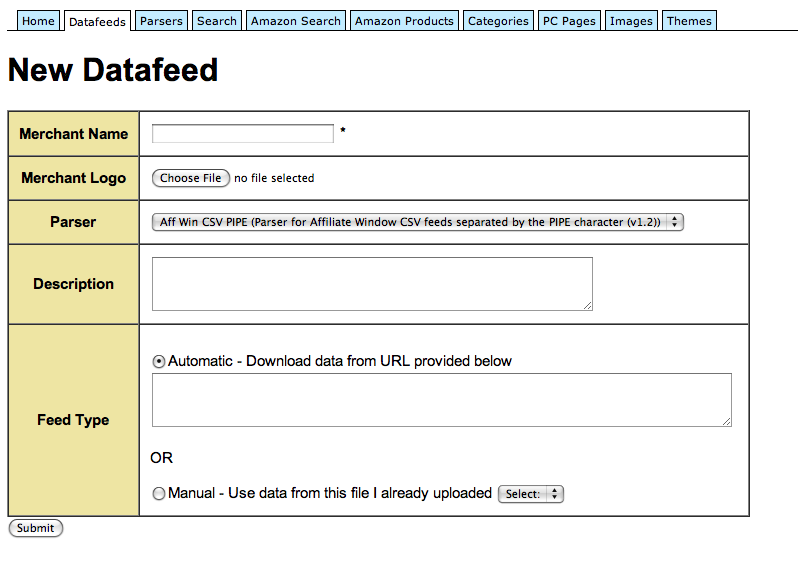
You are prompted for the following information :
Merchant Name - name of the merchant, e.g. Dixons.
Merchant Logo - the logo to use for this merchant. You can usually find a suitable logo for a merchant from your Affiliate Network (e.g. Affiliate Window, CJ.com, TradeDoubler) administration pages.
Parser - the type of parser required for the feed. Datafeed Studio comes with several parsers pre-defined for the likes of Affiliate Window, CJ, TradeDoubler and BuyAt affiliate networks (or you can easily create your own - see Parsers section later).
Description - an optional description for yourself about this datafeed.
Feed Type - you can choose Automatic or Manual. For automatic feeds, you must enter the HTTP URL of the feed, as provided to you by your Affiliate Network. When obtaining the feed URL from your Affiliate Network ensure that you choose the correct options to match the type of parser you are using (e.g. CSV files separated by the PIPE character). If you choose a manual feed, you can select any file that you have uploaded into the admin/datafiles folder as the basis of the data.
A feed must have a parser associated with it. A parser converts the CSV datafeed files published by affiliate networks into the internal database format used by Datafeed Studio.
Datafeed Studio come with parsers for popular affiliate networks as standard but you can easily create your own if needed.
To see the list of installed parsers click on the Parsers tab.
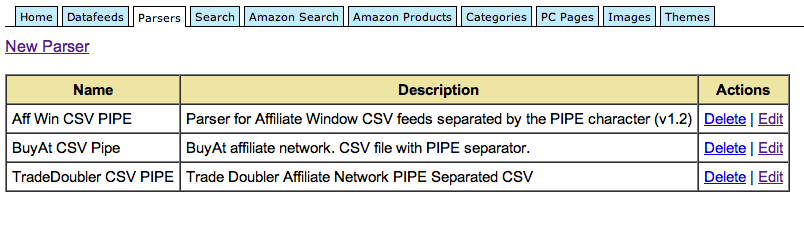
From this screen you can edit the parser (change mapped fields, configure filters, etc.), delete a parser or create a new one.
When you create or edit a parser, you are presented with the following screen :
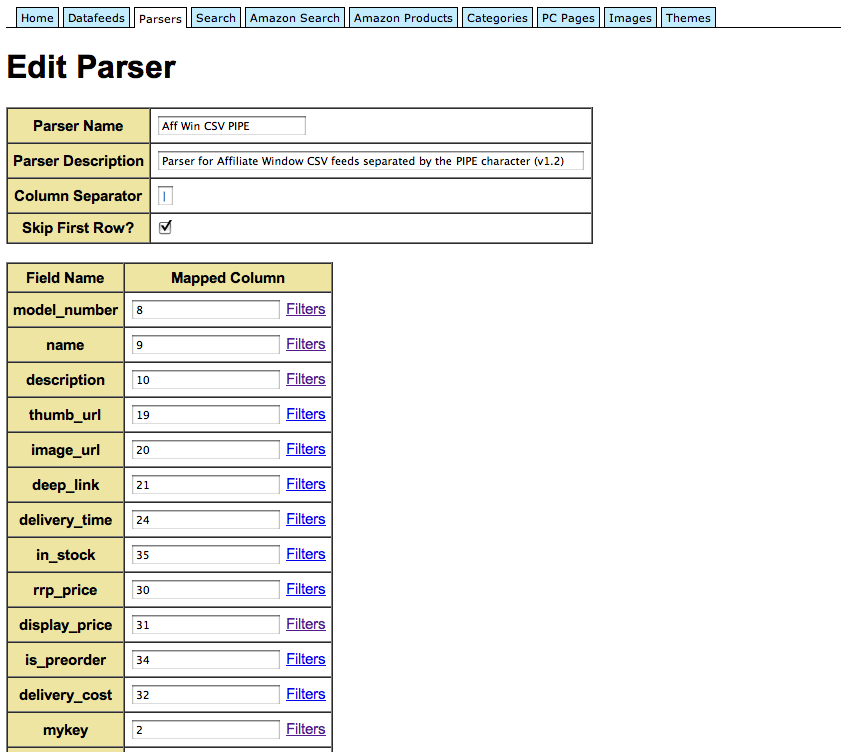
The first table asks for the following information :
Below this information is another table that lists all the Datafeed Studio column names on the left hand side, and allows you to enter what column position in the datafeed CSV file that the parser should use to map the column (starts at zero.)
You can also specify one or more Filters that can act on the data being processed. To enable this click on the Filters link next to the column you wish to provide special rules for and follow the on screen instructions.
Currently supported filters are :
BUYATSTOCKSETTER - a special filter for handling the BuyAt affiliate network stock status.
REPLACE - allows you to replace text that matches the value you specify with a new value.
The Datafeed Studio administration interface provides advanced search capabilities that allow you to categorise, edit and view your affiliate products with ease.
To access the search interface click on the Search tab.
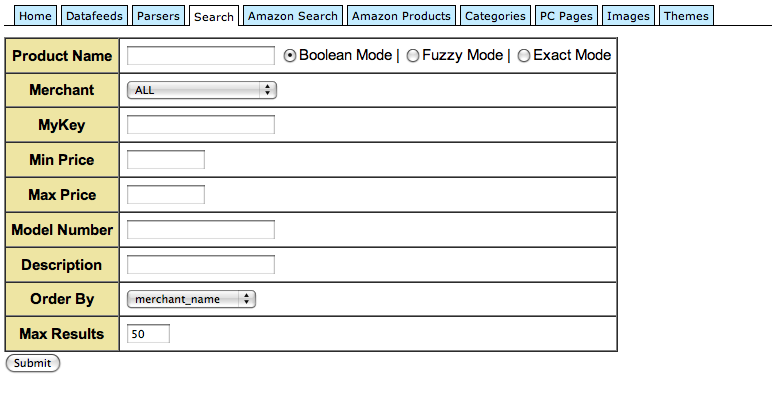
Here you can enter one or more criteria to search your product database.
Of special interest is the Product Name field, which has three options :
Boolean Mode - all words entered are searched for (in any order). If you want to omit products that have a particular word you can prefix that word with a minus sign, e.g. “xbox 360 -elite”.
Fuzzy Mode - does a SQL ‘like’ match against the data, matching any products that contain your search phrase anywhere within the name of the product. Note that this is the slowest of the search types.
Exact Mode - only returns products that have a name that is an exact match with your search term.
Results for your search are displayed below the input criteria. The input criteria remains shown so you can tweak your request until you get the exact group of products you desire.
Note that the raw database SQL used to perform the search is shown along with two handy links that allow you to create a dynamic category based on this SQL, or a standalone price compare page (see later sections).
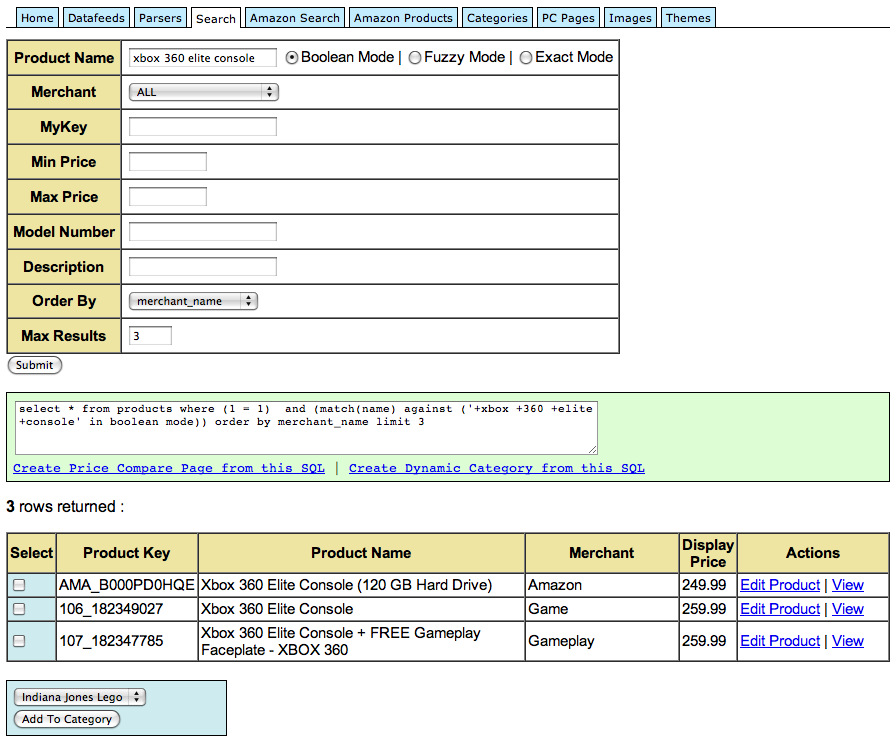
For each product shown, the following details are displayed :
Select - selects this product for addition to a category
Product Key - the unique identifying key for this product. Useful to know for the Datafeed Studio themes that allow you to specify a particular product as “Featured” or as a “Hot Product.”
Product Name - the name of the product.
Merchant - the name of the merchant that sells this product.
Display Price - the price of the product.
Actions - Choose View to view this product on the merchants site, choose Edit Product to view and edit information about this product.
Below the search results a box is displayed listing any product categories (groupings) you have created. You can choose to add one or more products to a category (see later section for more information about Categories.) by selecting the target category and pressing the Add To Category button.
Clicking on the Edit Product link next to a product returned in search results allows you to view and override the information displayed about a product, e.g. you can change the title, description, image, etc. of a product to suit your own needs. This feature is desirable as it allows you to create your own unique content for your products, ideal for optimising your pages for search engines.
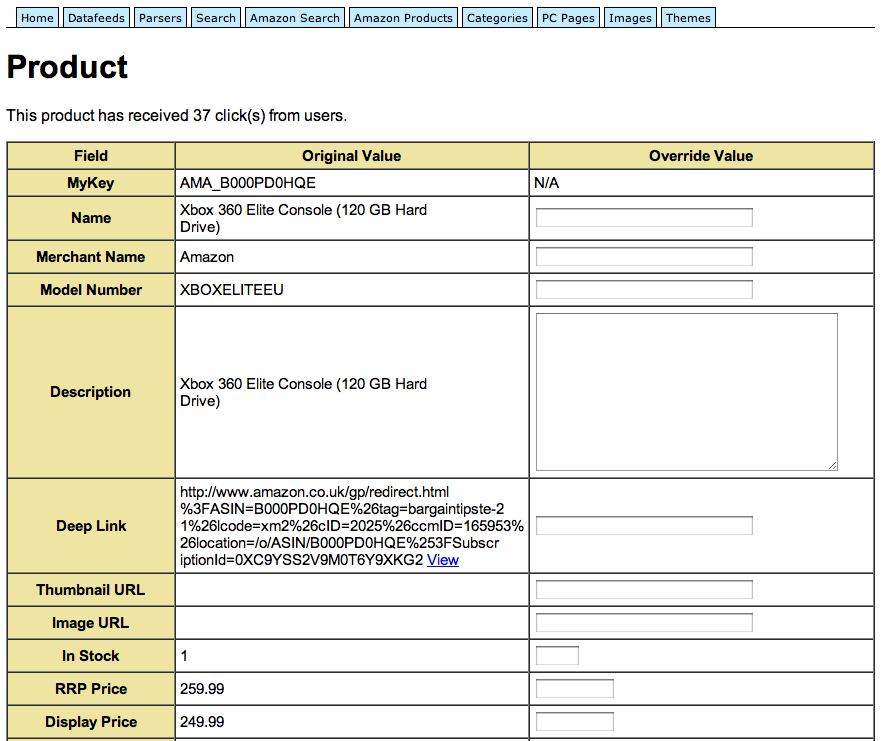
This screen shows the original data as supplied by the feed in the left hand side, and gives you the opportunity to ‘override’ these values in the right hand side.
One important field is the "slug". This value will act as the permalink to your page if you have enabled SEO friendly URLs in the main configuration file (enabled by default).
If you set this value, then the URL for the product will change from http://yoursite.com/mykey.html to be http://yoursite.com/slug.html.
This setting enabled you to provide search engine friendly URLs for your products, e.g. http://yoursite.com/ipod-touch-30gb.html insted of http://yoursite.com/12345678.html.
You can also choose to Ignore the product from being displayed on your affiliate sites.
An advanced option is the Price Compare This Product? input field. Entering SQL into this field will override the default view in certain themes, which is to display just the one price from the merchant the product it belongs to. Instead, the SQL in this field will be used to generate a dynamic price comparison table containing a list of matching products.
If you are not familiar with SQL a good tip is to use output SQL generated when you do a product search, i.e. use the search feature to find a list of products that are similar to the product you are editing, and copy'n'paste the SQL generated into the Price Compare This Product? field.
When happy with your override values, click Update Product to save your changes. Note that these override values are ‘sticky’ and will remain even after the datafeed is next scheduled to be imported - your changes are not lost.
Datafeed Studio supports the addition of custom products into your database. These are useful in situations when want to add merchant products that for whatever reason aren't available in their datafeed.
Another useful scenario is combining custom products with the Price Compare This Product? feature of the product editor. For example, for your niche online store you might prefer to create a dozen or so featured products from scratch with your own content and images, and only take the prices of the product from different merchants with the price compare facility.
To create a custom product, click on the Search tab and click on the Create Custom Product link. Enter as much information as possible on the screen that is displayed, you are then taken to the usual Edit Product where you can put the finishing touches to your new product.
Amazon have moved away from datafeeds of their products and now promote access via Web Services.
Datafeed Studio comes with built in support for accessing Amazon’s Web Services (you will need to register with Amazon Associates and obtain the relevant access IDs and keys and provide these when you install Datafeed Studio, or edit the configuration file admin/includes/config.inc with this information).
With Datafeed Studio’s Amazon support, you can search Amazon’s huge library of products, and add the items of interest to you into your Datafeed Studio database, allowing them to be featured on your affiliate sites.
If you have configured Amazon support, select the Amazon Search tab.
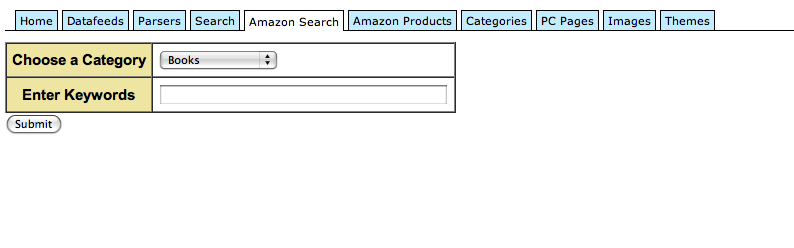
You are prompted to enter the search keywords and the particular Amazon category of products you wish to search for.
All matches found are displayed as follows :

For each product, the following information is displayed :
View Item - open the product on Amazon’s site.
Title - the title of the product.
Author - the author of the product (for books).
Price - the price of the product on Amazon.
Action - selecting the ‘Track and Add To My Products’ button adds this product to a list of Amazon products that you wish to import into your Datafeed Studio database. It also allows you to track this product, meaning that any updates to price, description, etc. will be updated automatically. See later sections on how to automate datafeed imports and tracking of Amazon products.
If you have enabled Amazon support within Datafeed Studio and have added any products via the *Amazon Search tab, this screen will list them, and allow you to remove them from the list of tracked Amazon products.
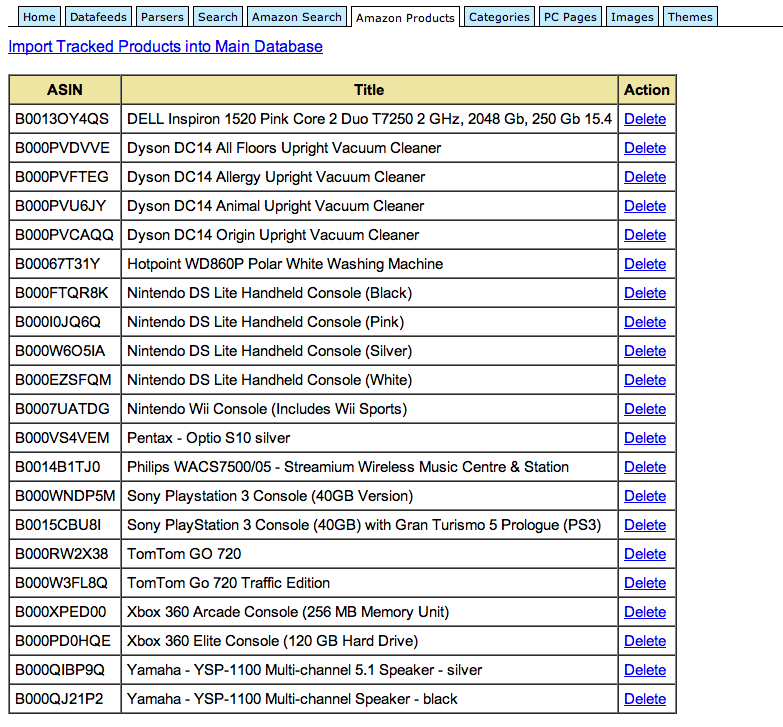
It is highly recommended that you configure automated support of importing these Amazon products into your database at regular intervals to ensure that the prices you display on your affiliate sites reflect those on Amazon, but you can also select the ‘Import Tracked Products into Main Database’ link on this screen at any time to force an immediate import.
Products stored within your database can be grouped into categories.
Clicking on the Categories tab displays all your existing categories.
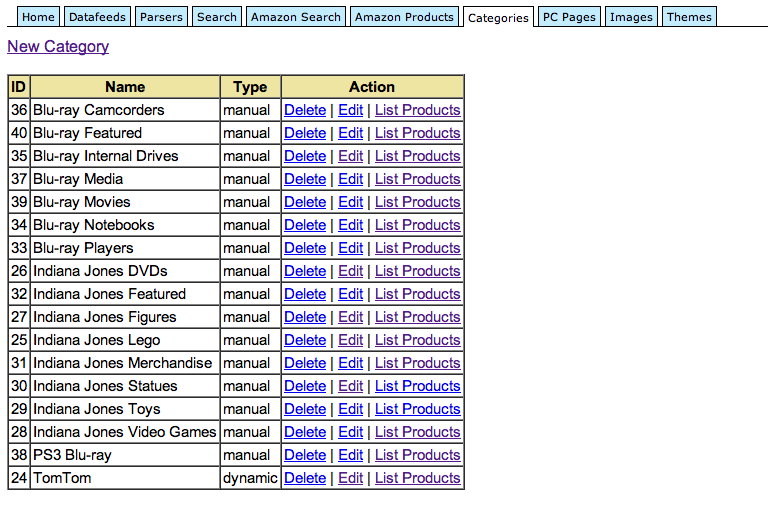
For each category the following information is displayed.
ID - unique ID of the category, you may need to provide this in the settings of your themes.
Name - name of the category.
Type - type of category, Dynamic or Manual (see below).
Action - Delete - removes the selected category, List Products - lists all products in this category (and allows you to view / delete as appropriate), Edit - allows you to update the settings of this category.
When you create a new category, or edit an existing one, you are presented with the following screen.

You are prompted for the following information.
Name - name of the category
Description - brief description of the category.
Blurb - longer description of the category, can be used in certain themes to provide some introductory text when displaying a collection of associated products.
Type - categories come in two types, Manual or Dynamic. With Manual products you are in full control over what products get added to the category (via adding them on the search screen), whereas dynamic products update automatically based on the SQL code you provide (remember that if you are not familar with SQL you can create a dynamic category from the search results screen by clicking on the ‘Create Dynamic Category from SQL’ option).
Slug - When SEO friendly URLs are enabled, this field will be used as the permalink to this category, e.g. settings to to hotpoint-dishwashers will result in a URL of http://yoursite.com/category-hotpoint-dishwashers being used as the display URL for this category.
As you can have up to unlimited datafeeds within Datafeed Studio, it is a great resource for creating profitable ‘price compare pages’. These pages usually contain a summary of the product being promoted, together with a list of stores that sell them, and the prices they are offered at (see example and can be promoted via PPC methods to make a healthy profit).
Datafeed Studio allows you to create unlimited price compare pages off the domain you installed the software, e.g.
http://mysite.com/my-pcpage-for-widget-abc
http://mysite.com/another-page-for-xyz
To view all current pages you created, click on the PC Pages tab of the administration interface.
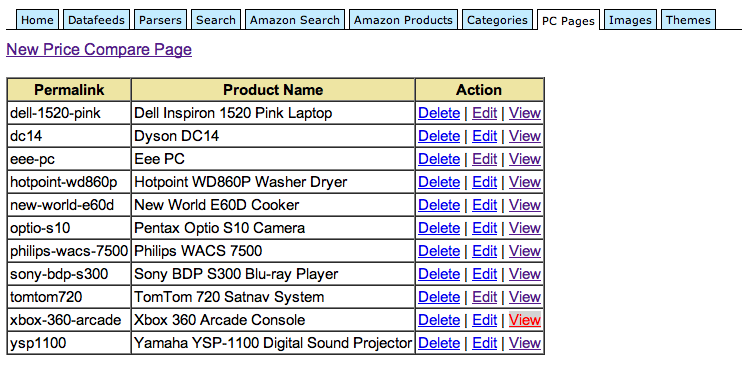
For each page created, it shows the following information :
Permalink - the path to the page, e.g. in the example above - “my-pcpage-for-widget-abc”
Product Name - name of the product the page is promoting
Action - Delete - removes the product from the list, Edit - allows you to edit the settings of the page, View - allows you to view the created page.
To create a new price compare page link, click the link New Price Compare Page.
When you create or edit a price compare page you are prompted for the following information.
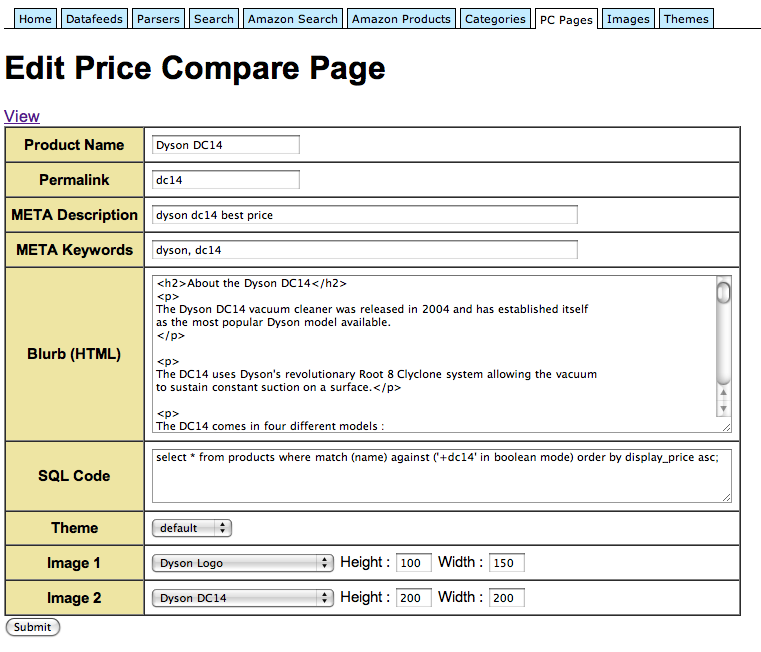
Product Name - name of the product you are promoting (e.g. Dyson DC14)
Permalink - path to the shown in the browser for this link (e.g. dyson-dc14). No spaces allowed.
META Description - provide search engines with a brief description of what this page is about.
META Keywords - provide search engines with comma-separated keywords that reflect the content of this page.
Blurb (HTML) - here you can enter HTML code describing the product in more information.
SQL Code - the SQL code to be used to generate the list of products to be price compared (remember if you don’t know SQL you can use the Create Price Compare Page from this SQL link on the main search results screen to populate this)
Theme - choose from one of the presentation themes for your price compare page.
Image1 - select one of your uploaded images to use in the price compare page. Image1 is normally a logo (remember to provide height and width.)
Image2 - select one of your uploaded images to use in the price compare page. Image2 is normally a picture of the product (remember to provide height and width.)
Click Submit to save your changes.
For use in your themes (especially Price Compare Pages), Datafeed Studio allows you to upload images.
To view a list of all uploaded images select the Images tab in the administration interface.
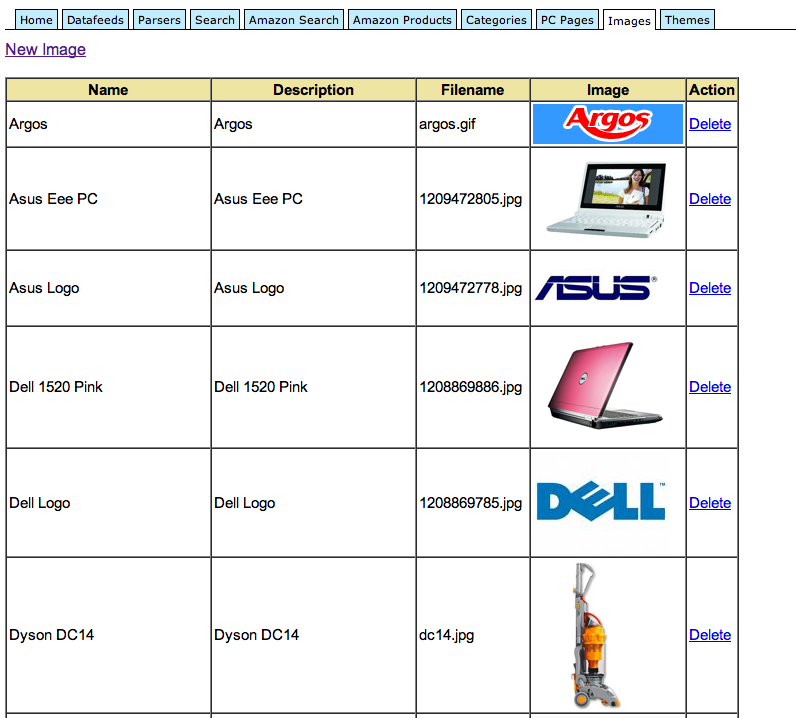
For each image the following information is displayed.
Name - name of the image.
Description - brief description of the image.
Filename - filename of the image (you will need this if you want to reference images in themes yourself).
Image - the image itself.
Action - Delete - removes the image from the list.
To create a new image, click on the New Image link.
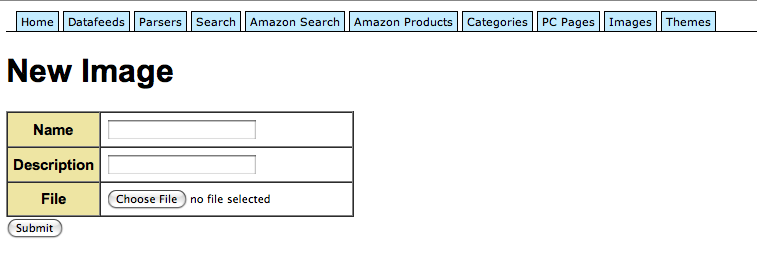
You are prompted for the following information :
Name - name of the image.
Description - brief description of the image.
File - allows you to upload the image file.
Click Submit to save your changes.
If you need to reference this image in your themes, you can access it via :
http://yourdomain.com/images/<filname>
where filename is the name displayed on the Images tab for your image (it gets a new unique name when you upload it.)
e.g.
http://dealdrop.co.uk/images/1209472805.jpg
Each of the different site types that Datafeed Studio allows can be themed.
Themes are stored in the templates folder of your installation. Inside this folder are subfolders for each of the different types of supported Datafeed Studio sites, e.g.
templates/pcpages
templates/pricecompare
templates/store
and inside each of these subfolders are folders for each distinct theme, e.g. for the store site type :
templates/store/default
templates/store/modern
You can edit these files directly on the file system, or choose to use Datafeed Studio’s internal theme editor.
To use the internal theme editor, select Themes from the administration interface and select the theme you want to edit from the drop-down menu. Once selected, a list of all files used by that theme is displayed. Click on the file you want to edit.
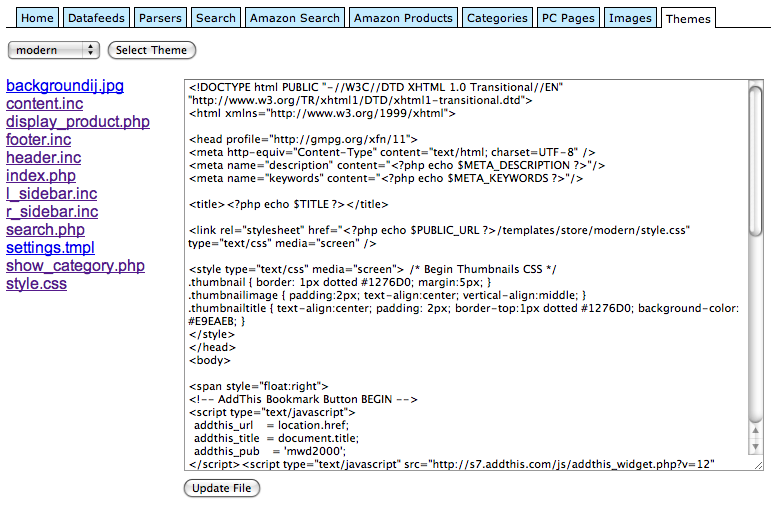
The contents of the file are displayed. Make your changes and click Update File to save your changes.
Note that the file style.css (except for standalone price compare page themes) is used as the default style for the theme and any new sites registered will pickup the changes you make here but existing sites will use their local CSS file which can be changed via the Style link on the list of registered sites displayed on the administration home screen.
In other words, the style.css is the base CSS file for the theme, but when a site is registered gets its own distinct copy of that file (technically this is stored in the site_configs folder with the name [site id].css). This allows you to create many sites that use the same main theme, and allows you to customise them via the local CSS file to give them a different presentation rather than duplicating a whole theme each time you want to make a slight tweak to one of your sites.
To create a new theme, create a copy of the theme that most resembles the new one you want to create, e.g. using the UNIX operating system copy command :
cp -rf templates/store/default templates/store/mytheme
or alternatively you can do this via your FTP client if preferred.
The new theme will automatically be available for selection on registration of a new site (and within the theme editor.)
Some common theme features such as menus, pagination, etc. can be found in the lib folder of your Datafeed Studio installation under their respective filenames.
One important function used by the majority of themes, display_rows can be found in the functions.php file. This function controls the rows of information when displaying results. At the bottom of the function are different display routines depending on the context it is called in, i.e. single page, gallery mode, price compare mode, etc. Edit the embedded HTML here to suit your needs.
Datafeed Studio allows you to operate several sites at once. There are two main ways of doing this, creating a new Datafeed Studio installation for each site, or creating multiple sites off one datafeed installation. Each has its pros and cons.
With one installation per site, you create a new Datafeed Studio installation for each affiliate site you create.
Pros:
each site is unique, with no potential of “accidental spillage” of unwanted products from Site A appearing on Site B.
each site can be on different hosts.
Cons:
Alternatively Datafeed Studio supports multiple sites working off the same data. In this instance you install Datafeed Studio once on a ‘master site’ and share the software and data between your affiliate sites.
Pros :
less administration.
can share data (including reviews, customised product content, etc.) between sites.
Cons :
only one site can act as the master administration interface (this is typically the site you first installed Datafeed Studio on)
all sites must have a copy of Datafeed Studio installed. The recommended way of doing this is to symlink all sites to one copy of the Datafeed Studio installation. This implies that all sites are located on the same physical host.
Datafeed Studio come with a set of command-line scripts that you can use with your operating system’s scheduler software (e.g. cron).
The three scripts are located in the following folder :
admin/bin
and are described below :
This PHP file can be used to download and import (refresh) a single datafeed or all datafeeds.
To download all datafeeds use the following command :
php import.php all
To download a specific datafeed, suppy its ID (as displayed on the administration site) :
php import.php <id>
on the command-line.
This PHP command lists all the datafeeds in your system (ID and name). It can be useful if you are trying to quickly find the ID of a feed to use in conjunction with the import.php command described above.
To use it just enter :
php listfeeds.php
on the command-line.
This command refreshes your tracked Amazon products. For each Amazon product you have added via the administration site it contacts the Amazon Web Service to get the latest information about the product (price, stock, etc.) and updates the product in your main database.
To use this command enter :
php amazonimport.php
on the command-line.